So it may have been years in the making, but we finally did it… We finished our mausoleum for our yard!
We planned on this being a multi-part project and thought we’d just “slap it together” and just live with it this year, but we were both really pleased with how it came out, we don’t think it needs a whole lot more. Maybe we’ll add some architectural details/interest, and I thought about moss and more aging.
Here’s the run-down of how we did it!
We started the process by using this drawing as a a loose reference for the general shape of our mausoleum.

Travis did a ton of research online about how to actually go about building it and scoped out some other folks’ projects to get an overall generalization of what materials to use.
Then he took a trip to Team Blue (Lowe’s) and bought ten 2×2’s and four sheets of plywood. The guys at the store did some of the rough cutting for him, but since we were really just wingin’ it, most of the cutting got done at home.
This is Travis’ quick explanation of how he built it:
- I figured out the size that I wanted it to be – each wall is 4ft long and 5ft tall
- Cut the plywood into the correct sizes (measure twice, cut once!)
- Cut the 2x2s to the right length in order to make the frame
- I made 3 walls, then screwed them together
- Then I made two 1ft long by 5ft tall pieces to create the two front walls, which gave me the 2ft wide doorway
- For the roof, I used two 4ft by 3ft pieces and framed those as well to create the peak
Once the whole thing was built, we put on 2 coats of exterior paint.

For the arch over the doorway, we re-purposed our homemade “whacky boat” we made this summer for our family’s lake house regatta. (Thats that huge pink surf board looking thing behind Travis, above.) Which are in fact pieces of foam insulation board. The same goes for the “belt” piece around the middle. That part will eventually be painted to look like stones. The little ledges to the left and right of the doorway are made of scrap 2x2s.
To cover up the lines and darken up the inside to make our white ghost stand out, Travis used some horrible red paint that The Others left behind when they moved. It was actually the color of our 6 ft by 4ft bathroom when we moved in. Sexy.
I then mixed up a small batch of grey paint; I used white paint exterior with a tiny bit of black paint, then I thinned it out with several cups of water to make it about the consistency of thick watercolor paint. (I’d say the final mix was probably 2 cups of paint to 5 cups water, but that’s a rough estimate. I lost count, I just added water until I got the consistency I wanted.)
We used a cut up tshirt to color-wash the exterior. We used several different “techniques” like wiping and dabbing to create a cement-ish texture. I’ve heard of people using grocery bags to achieve a similar look, but I thought that would take too long. The tshirt really soaked up a lot of paint and kept me from having to reload it over and over.
Once the whole thing looked like concrete, I went it with varying shades of black and grey paint and dry-brushed in the aging, to make the whole thing look like concrete or stone does after it’s aged for decades. To dry brush, you literally use a dry paint brush to apply the color in very thin layers.
I started out with black along the edges and where I wanted serious aging “shadowing” and then went back in with some of the color-wash and applied that on top and just blended it in towards the center of each panel. Travis helped me with the bottom, once he got the hang of it, he really did a great job and he considers himself to be “very not artistic.”

I used a small paintbrush to add in cracks and paint in the spots above the ledges to make them look recessed into the stone. We’ll eventually add some sort of candle or torch there. We mounted a skull above the door that we had from another Halloween decoration that we didn’t use. You could put just about anything there… we thought the skull was pretty cool!
THEN came the fun part. We had to get this puppy through our 3 ft wide gate! Finished, it is 4ft wide by 7ft tall. We ended up having to remove the roof and carry it through in two parts, that was easier than we anticipated.
Once we had it set up where we wanted it in the yard, we hung our Lady in White inside. We have read all sorts of blogs that have animatronics that people have custom-built themselves and they look really great… But we priced out the parts needed to make her from scratch and we decided that buying this one from Spirit was far cheaper and worth it for us. Her arms move up and down! Maybe someday we’ll custom-make something to go in there, but this lovely lady seems to be working out super.
We initially wanted to do a name placard over the doorway, but we couldn’t agree on a name to give her. We Googled all sorts of famous ghost stories of ladies in white and couldn’t come to an agreement on one we thought was fitting. So we’ll come up with our own… But it’s gotta be good, and these things take time.

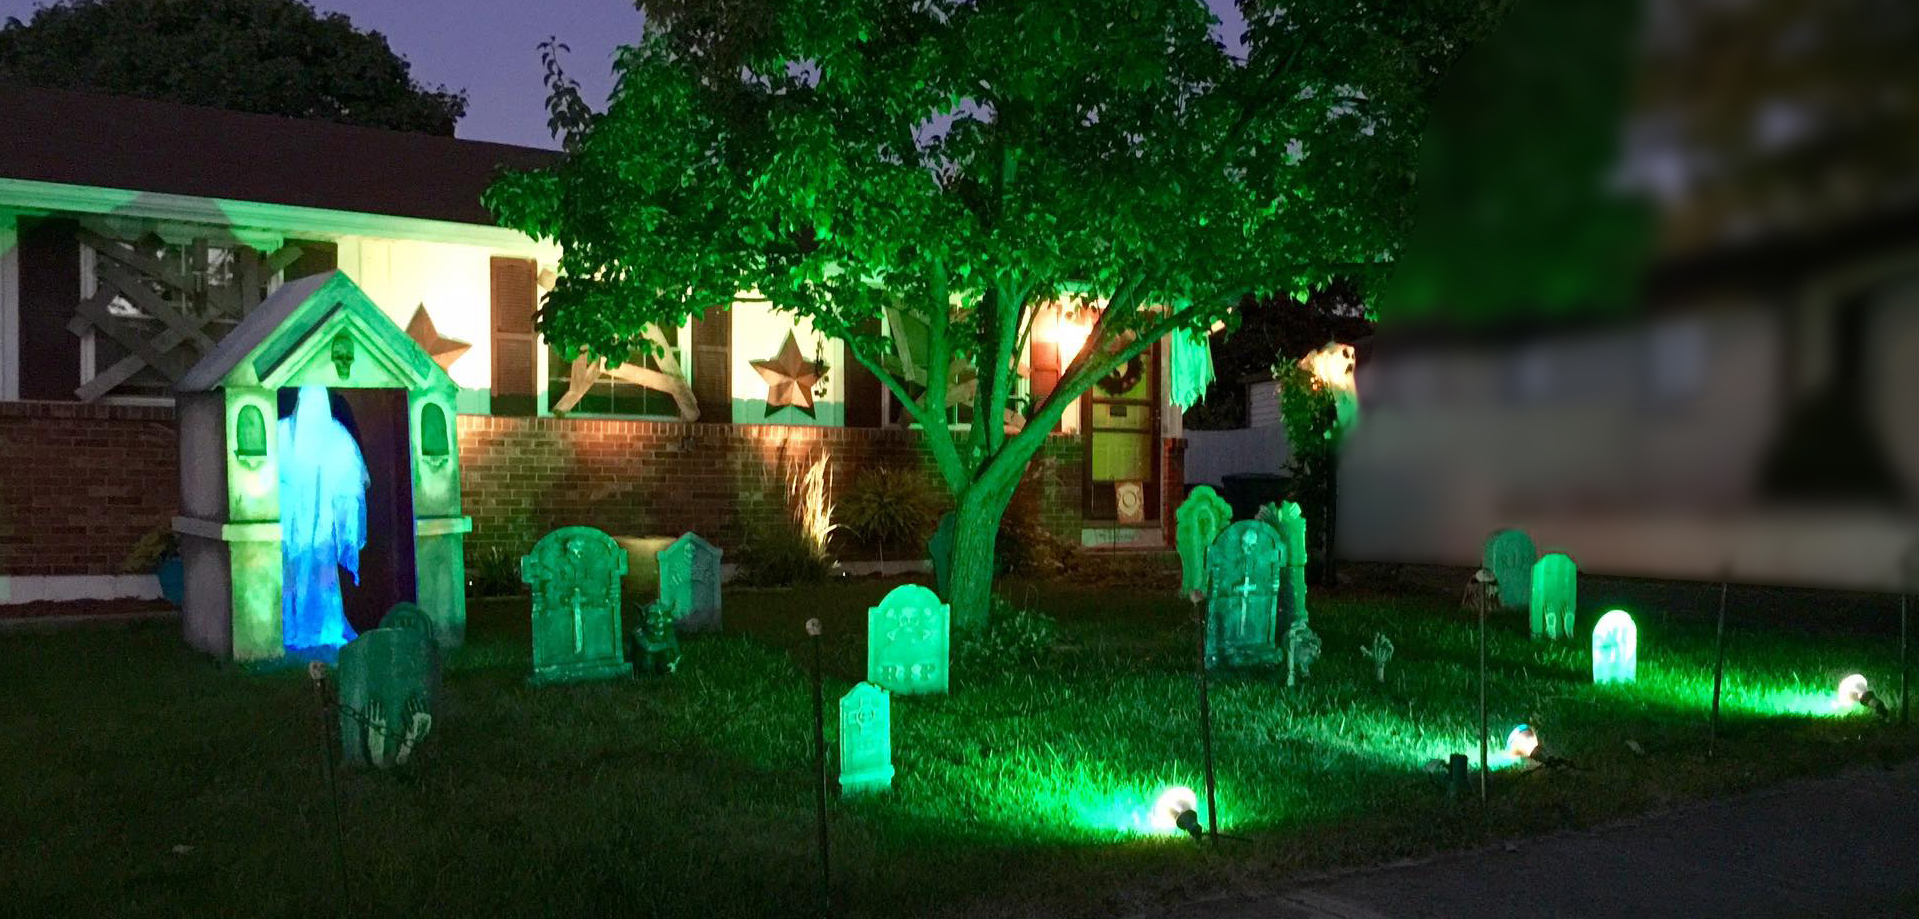
And what mausoleum is complete without the perfect ambient lighting?! So we purchased these Fire & Ice LED spotlights. One in green and one in blue. They each have motors on the inside that spin the internal light source through the diamond-cut dome, which makes the lights sort of shimmer. The best way to describe it is when light reflects off of water onto a surface.
The green one shines onto the front of the mausoleum, and we mounted the blue one on the interior, pointed downward onto the Lady. It gives it a sort of spectral, misty look. It looks almost like a really bright black light on her white dress.
And this is what the finished product looks like… Drumroll please….


And it blends in nicely with the rest of the graveyard, which is not quite done yet. We have a lot of items still to be put out. Plus on Trick or Treat night, we put in fog machines. But it is also lit up in blue and green to give it that sort of swampy-bayou feel!
All in all, we spent about $60 to build the mausoleum. Which doesn’t factor in that we had a coupon and two leftover gift cards from a return we made previously!
- Plywood
- 2x2s
- 2 inch screws
- 1 quart of white paint
- 1 quart of black paint
- 1 gallon of fence paint (already had)
- 1 sheet of foam insulation (already had)
- 1 gallon red paint (already had)
Then we bought the other items at Spirit, but also had a 30% off coupon for those, so we spent well under $100 on:
- Ghost lady
- Green Spotlight (already on sale!)
- Blue Spotlight (already on sale!)
It took Travis probably 2 hours to build it. The painting took probably 3 hours over the course of 3 evenings after work. This is something that could easily be done in much less time, but we kind of took our sweet time.
It’s been up for about a week now and so far so good! We’ve even had some rain and everything seems to be holding up really well. The fact that we used fence paint meant for some hard-core elements is probably it’s saving grace. We made sure to get the paint on really thick and into all the nooks and crannies that will be exposed. After this season, it probably wouldn’t be too crazy of an idea to put some sort of sealant on it and even get into the interior and paint every inch of it. Considering the inside is just latex interior paint, it probably wouldn’t hold up long-term without a sealant. But for the couple weeks it will be in the yard this year, hopefully it will hold up nicely.
Well there you have it! Happy Halloweening!

